Results 1 to 10 of 10

Thread: Rendering made easy. Now with more Maya!

  1. #1

    Lightbulb Rendering made easy. Now with more Maya!

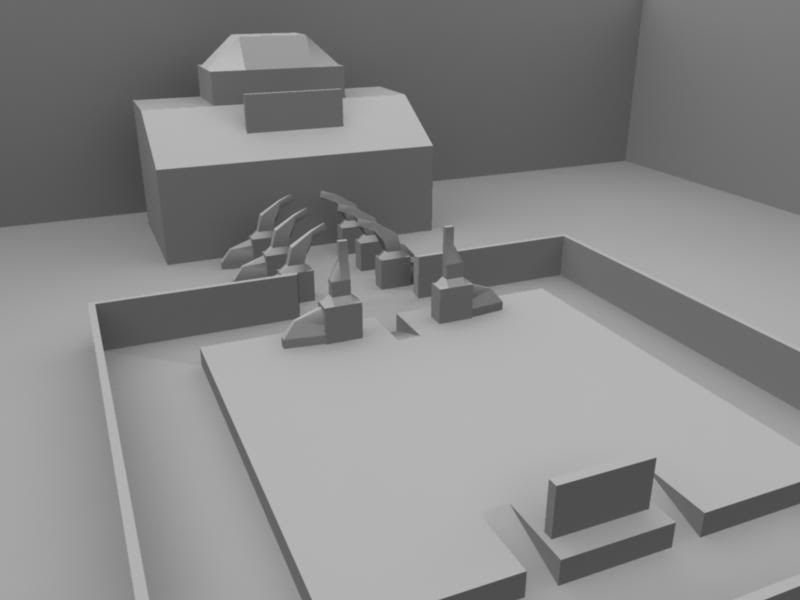
    It is very important that when you present a model for critiquing, or even just showing off, you present it in the proper manner so that those who are reviewing it can easily make out the details. Most people use the simple "clay render" render technique. While this works, it does not give a good, clear representation of the details on the model. This tutorial is to help you make decent renders for posting work.


    Step 1:To start off, you want to make every mesh the same color. It's best to use some shade of gray.

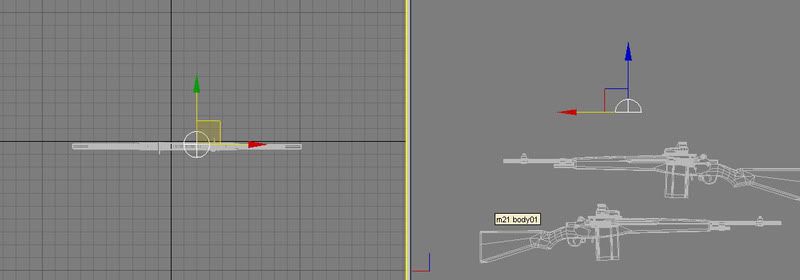
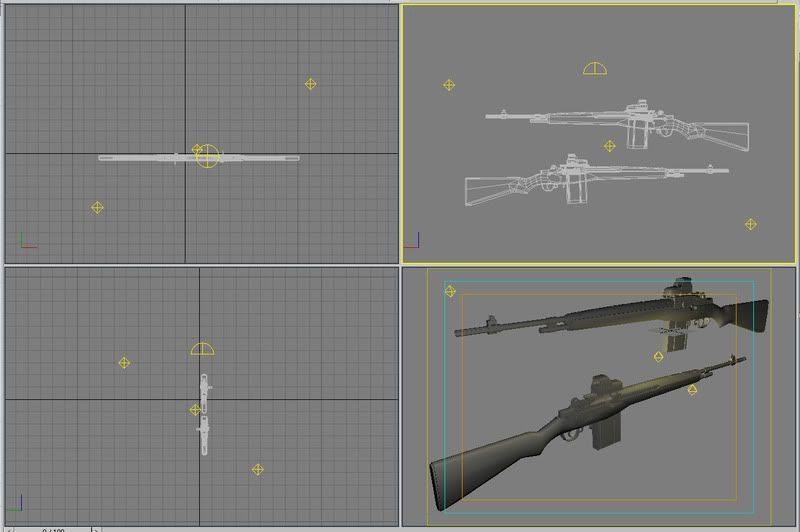
    Step 2: Next you need to position the model. You want both sides of the model to be visible. Simplest and quickest way to do this is duplicate the model. Select all + Shift, then drag the model downward. Then click "Ok" on the box that will appear.
    After you've duplicated the model you want to rotate it 180 degrees and position it nicely below the original model.


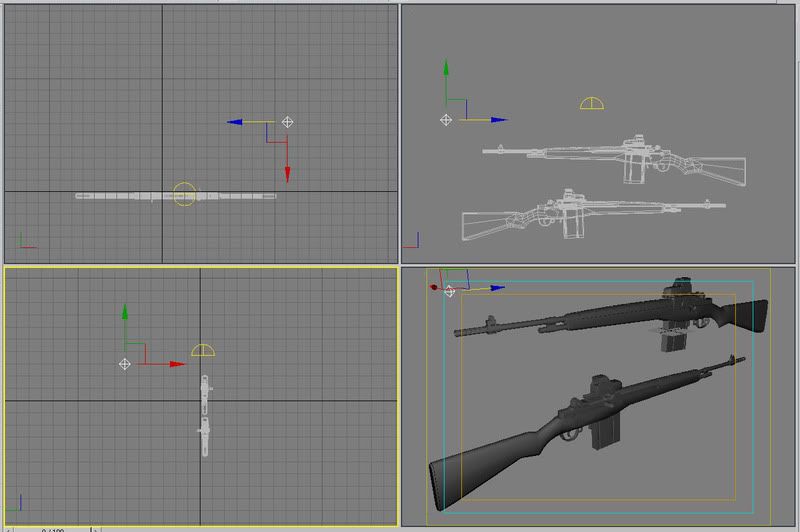
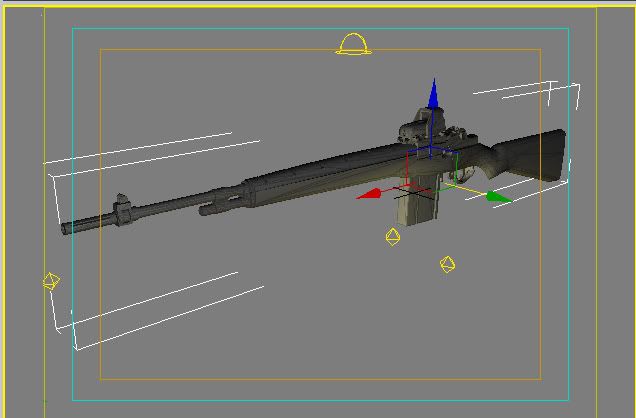
    Step 3: Next you're going to need some lighting. What I usually use, and find quite effect is the use of 1 Skylight, and 3 Omni's. So you're going to select the "Create" tab and click on "lights"


    Step 4: First you need to setup the skylight. Just click the skylight button and position it over top of the model.


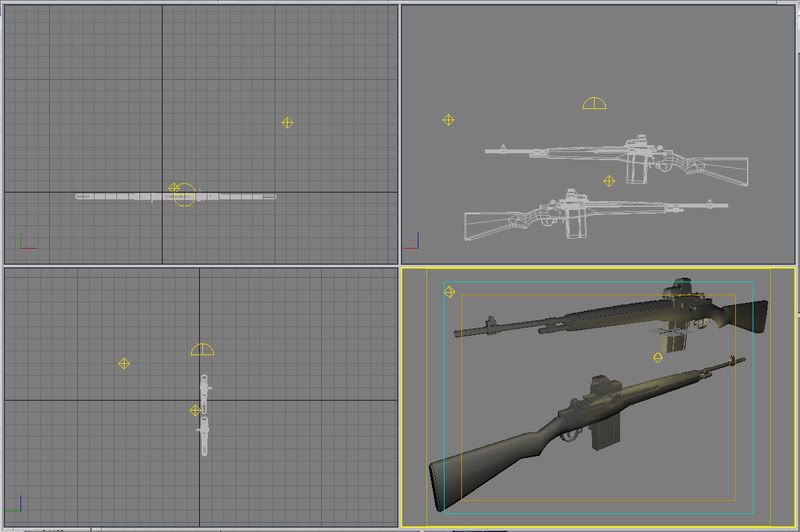
    Step 5: Now for the Omni lights. Before we place the omni light we have to change a few things, click on the "Intensity/Color/Attenuation" tab that is below the light select. Then where it says Multiplier, you want to change that to 0.5.


    Step 6: Place the first omni near where the Perspective viewport camera will be looking from.


    Step 7: Repeat step 5, only this time set the multiplier to 0.4 and change the color (Located next to multiplier, the white box). Any color is fine but for the purpose of this tutorial, we're going to use a shade of yellow.

    Step 8: Now place this omni somewhere in between the 2 models.


    Step 9: Repeat step 7 this time, using the same yellow color, only now make the multiplier 0.3 and place this one basically opposite to the first omni we placed in step 6.


    Step 10: Once the lights have all been placed, press F10 to bring of the render settings.

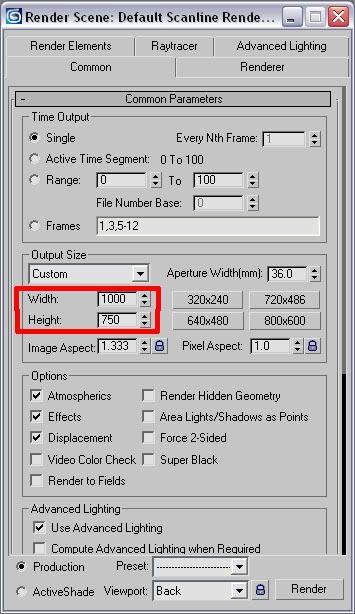
    Step 11: Select your resolution. Now when rendering a model, the absolute lowest resolution you want to use is 800x600. It is a better idea to use a higher resolution so the details can be easily seen. For this tutorial we'll use 1000x750


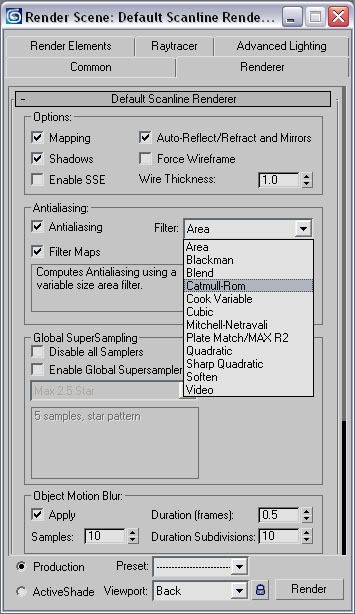
    Step 12: Click on the "Renderer tab". Where it says filter, click the arrow and select Catmull-Rom.


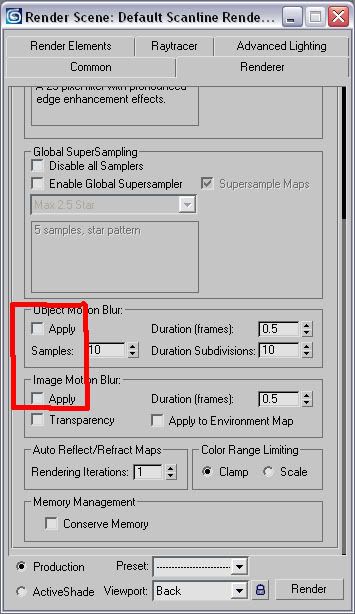
    Scroll down the menu and where it says "Object motion blur" and "Image motion blur" Uncheck the apply boxes. It should look like this.


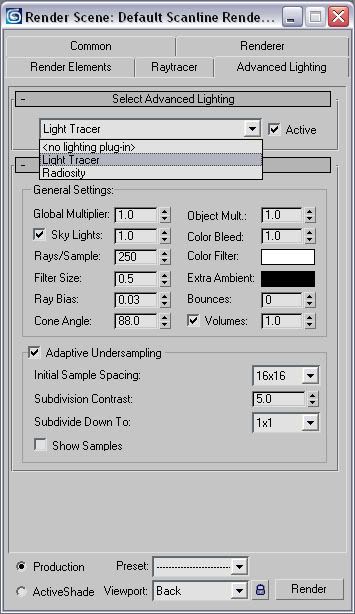
    Step 13: Click on the "Advanced Lighting" tab. Click on the drop down menu and select Light Tracer.


    Step 14: Click the "Render" button on the bottom of the menu.

    Step 15: ???

    Step 16: Profit.

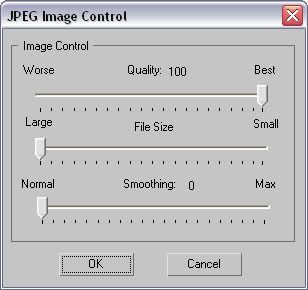
    Step 17: When saving the render, save as a .jpg and use these settings


    Every modeler has their own technique, some are better than others but this gives you a basic idea of how to make a decent render so people can actually see your model. "Fancy" renders are not for work in progress models. You can post them but they are NOT to be used as the only render to show your work.
    Last edited by PenGuin1362; April 6th, 2008 at 02:49 PM.
    Reply With Quote

  2. #2

    Re: Rendering made easy

    Part 2: Wireframe Renders.

    Selecting "Force wireframe" in the render settings does not count as a wireframe render. It is very difficult to make out certain details and parts of the model. Here is one way of making a simple wireframe render.

    Step 1: Duplicate the model but do not move it anywhere. Leave it overlapping the current model.

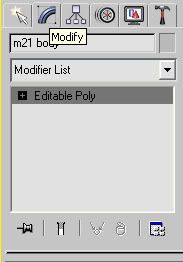
    Step 2: Click on the modify tab.


    Step 3: Click on the modifier list and select the "Push" modifier


    Step 4: Set push value to 0.3

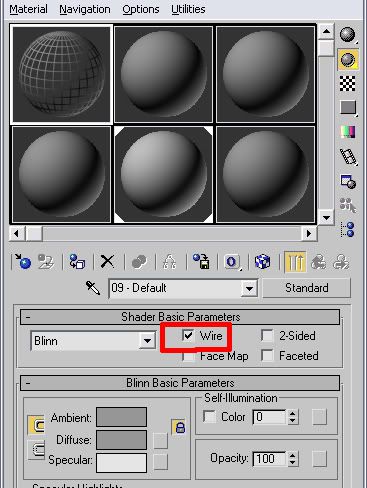
    Step 5: Still with the duplicated model selected, open the material editor. Under "Shader Basic Parameters" check the Wire box and apply the material to the model.


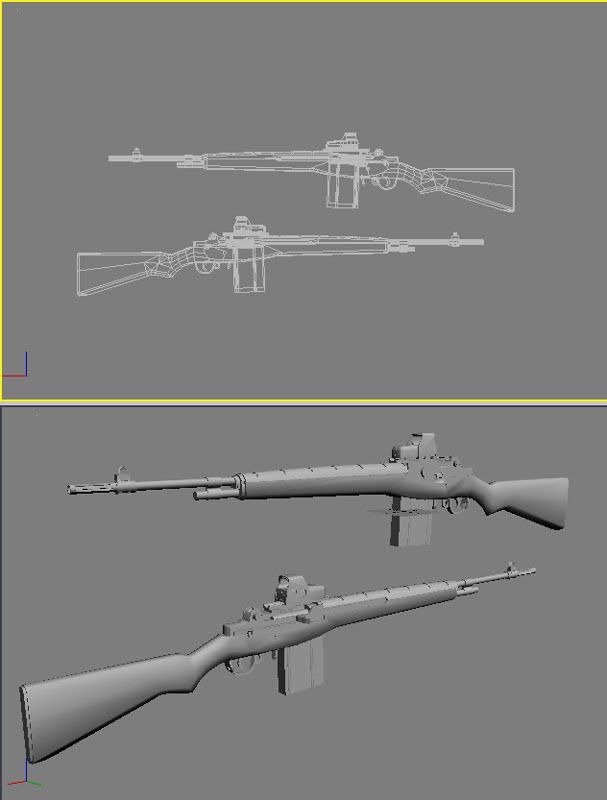
    Should look like this if done correctly.


    Step 6: Select both the modified and original model, duplicate, rotate 180 degrees, and position below the first model.

    Step 7: Keep render settings the same as the original render and render the new layout.

    Step 8: ¿¿¿
    Reply With Quote

  3. #3
    Senior Member Patrickssj6's Avatar
    Join Date
    Oct 2006
    Location
    'schland
    Posts
    3,838

    Re: Rendering made easy

    Good stuff...but a tutorial is suppose to explain and not like...
    Where it says filter, click the arrow and select Catmull-Rom.
    Click on the drop down menu and select Light Tracer.
    Even if you don't know what Catmull-Rom or Light Tracer indepth is, you could at least explain what it does...otherwise you could have just posted the .max render scene without the model.
    Reply With Quote

  4. #4

    Re: Rendering made easy

    Maybe that would have been a good idea O_o. And I suppose if it'll make you feel better I'll explain those : p. But not right now, at work atm >_<.
    Reply With Quote

  5. #5
    A Loose Screw Phopojijo's Avatar
    Join Date
    Dec 2006
    Location
    Ontario, Canada
    Posts
    2,749

    Re: Rendering made easy

    Maya "Clay Lighting" {Area Lighting}

    This is pretty much a direct copy/paste from a post I made back in 2005 at Gearbox. I cleaned it up a bit though.

    Those of you people who run Maya and are envious of all those people in Max who do clay rendering as such:


    Here's a simple and easy way to work around it for non-enclosed models (inside of a house will not work) -- you NEED Mental Ray {It comes with every copy of Maya I believe}:

    1) Surround your model and camera in a very large mesh that is all white and has a pure white ambient colour {you can adjust the strength as required}. This will be your area light. For guns, vehicles, and simple models -- a sphere is easy and works perfectly. If you're indoors it'll be harder and you may need to play with raytracing a bit... or having a giant hemisphere behind the camera or something.
    2) Take your model and give it the default Lambert shader, or a similar shader that's just colour... no crazy shaders or anything.
    3) Pop into MentalRay's render options, open "final gather" menu, then check "final gather". Default settings work.
    4) Adjust your other AA and such settings as you like, then render... it takes a VERY long time comparitive, especially since it needs to calculate radiosity beforehand.

    Note: Antialiasing in Mental Ray is *exponential*. 2 is actually ~4x Antialiasing. 4 is actually ~16x antialiasing. 8 is like 256x Antialiasing. I found that out the hard way when I forced it to 32 and it crashed... trying to calculate 4-billion-times antialiasing

    Enjoy.

    Credit to www.simplymaya.com

    You're essentially getting closer to Global Illumination... light's no longer coming from discrete points... they're coming from large areas.
    Last edited by Phopojijo; April 7th, 2008 at 02:15 PM.
    Reply With Quote

  6. #6
    Junior Member CG_Maxman's Avatar
    Join Date
    May 2008
    Posts
    6

    Re: Rendering made easy. Now with more Maya!

    I prefer predefined shaders that i apply and set lighting too. These are interesting rendering ideas. GJ

    (@Patrickssj6)
    In regards:

    The ' Catrom ' (Catmull-Rom) filter is another filter that produces a 'bicubic' interpolation function over a larger area

    'Light Tracer' This method provides for color bleeding and soft shadows, and it works well for brightly lit settings such as outdoor scenes. Light Tracer is easier to use than Radiosity, and does not attempt to create a physically accurate model.
    Last edited by CG_Maxman; May 15th, 2008 at 08:07 AM.
    Reply With Quote

  7. #7
    Driven by the B-Mashina Higuy's Avatar
    Join Date
    Nov 2007
    Location
    maryland
    Posts
    2,576

    Re: Rendering made easy. Now with more Maya!

    Thanks for the tutorial, It helped alot =D
    Reply With Quote

  8. #8
    Splendid! ExAm's Avatar
    Join Date
    Dec 2006
    Location
    Santa Cruz, CA
    Posts
    8,558

    Re: Rendering made easy. Now with more Maya!

    I just used this tutorial to make a wire of my APC, but I had to use a different push value. 0.3 is huuuuge >_>
    I'd go with 0.02
    Reply With Quote

  9. #9

    Re: Rendering made easy. Now with more Maya!

    it will vary depending on the scale of your model. I should have stated that. That model I used it particularly large.
    Reply With Quote

  10. #10
    Splendid! ExAm's Avatar
    Join Date
    Dec 2006
    Location
    Santa Cruz, CA
    Posts
    8,558

    Re: Rendering made easy. Now with more Maya!

    Ah, I should've guessed that
    Reply With Quote

Thread Information

Users Browsing this Thread

There are currently 1 users browsing this thread. (0 members and 1 guests)

Tags for this Thread

Bookmarks

Posting Permissions

  • You may not post new threads
  • You may not post replies
  • You may not post attachments
  • You may not edit your posts
  •